New hardware!

What happens when AV nerds grow up...

Okay, maybe my new setup doesn’t quite look like that but it is pretty sweet!

I was rockin’ an old HP Compaq DC7800 Compact Tower I purchased from work, with a nice max-out to a Core2Duo 8400 and 8GB RAM. It is a decent little machine, but it started to misbehave, so I got scared. All things figured, the mobo and power supply are probably 5-7 years old, so I thought it was time to go bigger…

I couldn’t reuse the mobo or case if I wanted to, cause HP locks you in by putting the stuff on the opposite side of the norm. This is my shocked face. On a side note, NEVER buy HP. Worst. Service. EVER! If it wasn’t a steal deal from work I would not have bought it.

IBM Portable Since I had to start from scratch, I started with the case. I am a guy that thinks a case should just be a non-descript box. Don’t get me wrong, I am not talking the old-school beige box here, but a case is a case, right? I realize now I was wrong.

I got a Corsair 300R case, and it is pretty awesome. It has great cable management capabilities, plenty of room to expand with more fans (if needed) and tool-less drive bays that are a breeze to use. My favorite thing was that the HD bays are ready-to-go for 2.5″ SSD drives. Nice!

Next was the mobo. I chose an ASRock Z87 Extreme4 based on the feedback I read. I have been out of the hardware game for some time, so I wasn’t really sure who the “players” are in the mobo market, but ASRock seems solid. The board is pretty even – all black and slick looking. It matches my case nicely. My favorite touch – a GUI BIOS? OMGWTFBBQ?!?! Are you kidding? With sound. I guess I could do without the starfield background, but a GUI BIOS is space-age, right?

After I got the backbone squared, it was on to the processor! I chose an Intel Core i5-4670K Haswell. The Haswell should meana little better power-consumption, and the K means overclocking. I have never done the overclocking thing, but with the processor it is supposed to be simple. Turns out it actually is. In fact, the BIOS has built-in overclocking settings that you can just point and click to choose. Idiot-proof.

My 8GB of RAM served me nicely, but I thought I’d try to keep the old hardware running if possible, so I opted to get some new RAM. The new mobo can take up to 32GB, so I went with 2x8GB G.SKILL Ripjaws. The RAM is pretty, liiks slick, and is a beast.

For power, I went with an OCZ ModXStream Pro 700W Modular power supply. The modular part is very nice – I can add/remove cables as needed, and it made my cable management much easier.

Finally, I figured if I was overclocking I’d better go with something a bit more substantial than the stock fan provided with the new CPU. I went with a Cooler Master Hyper 212 EVO which did not disappoint. The thing is massive and so far has actually been cool to the touch. I’ll have to do an hour or so of gaming and see what it feels like then.

All in all, I am extremely happy with the hardware. Then came the difficult part: I did not want to re-install Windows. Boy, it probably would have been easier, but I am here to tell you all hope is not lost.

First boot = blue screen. Ugh. The main issue is that all the drivers you need for this shiny new hardware are nowhere to be found on your existing HD. I started googling and found a lot of stuff like this. Everyone recommended startup recovery/repair. Well, a few attempts at that and it still wasn’t working. I was getting the error that an update was causing a problem, but that wasn’t really true, was it Windows?

A little more googling turned up this post which was the real info I needed. It was slightly unclear to me at first, but what you basically need is the drivers for your new mobo and you run the command to install the drivers on your existing HD. So, I pulled out the CD that came with the mobo and ran the command:

dism /image:c:\ /add-driver /Driver:g:\ /recurse

I ran it over the entire CD-ROM, and in retrospect that maybe was not what I needed, but who cares. I tried a reboot after, and same blue screen. However, running it through the startup repair a couple more times resulted in success! I am happily typing away on my new PC using my old SSD drive without a fresh install of Windows.

My final step in the journey was to see what my WEI numbers were with the new hardware. With the old setup, my CPU and RAM was the bottleneck with a score of 6.5 each. The graphics were at 6.8, and my SSD was 6.9 – all in all a pretty respectable score. Running the update blew my mind – my CPU and RAM jumped to 7.7 each, and most surprisingly, the SSD jumped to 7.9. Same old drive, just with better hardware support. WOW! I then used the BIOS overclock stuff and was able to bump up the RAM performance to 7.8. So now, my trusty low-power 9800GT Nvidia card is the bottleneck of my system – and that is a bottleneck I can live with.

photos by: DSmous & Soupmeister

Blacklisting with Project Honeypot

The other day I was looking at the traffic coming in to one of our sites and I saw some semi-suspicious traffic. turns out it is some sort of crawler, but that it has been linked in the past to some sort of trojan. This got me wondering how I could easily block traffic from an IP or a range of IP’s. I did not really want to use IIS to block IP’s, or have to enter individual IP’s (or ranges for that matter) into our firewall. I was looking for something a bit more automated.

A quick google turned up this post for an HTTP module. The module uses the blacklist from Project Honeypot. All one needs to do is signup for the PH api, make some minor modifications to the module and you are off an running.

A little more googling turned up another HTTP module on Github called BlacklistProtector. I did not look much at this code, but I imagine it is pretty similar and likely requires an api key as well.

One thing I did notice in the comments section of the first blog post is that the original creator of the module claimed PH had too many “false positives”. Granted, the comment was from a few years back, so it may not apply these days, but it is something to consider. I haven’t implemented the blacklist handler, but I thought it would be useful to allow for some method of overriding IP addresses. Perhaps when I finally do implement the handler I’ll add this capability. If I do, I’ll be sure to put the code up on Github and update this post with a link.

Execute powershell script as a scheduled task

I have a little cleanup function that runs on a website that I can trigger by hitting a URL. I wanted to run that as a task, so I googled how to create the powershell script and how to setup that script to run as a task. Here are the findings:

The powershell script

$webClient = new-object System.Net.WebClient
$webClient.Headers.Add("user-agent", "PowerShell Script")
$webClient.DownloadString("http://www.website.com/")

From Otto Helweg

Setting up the task

In the Program/script, put:
C:\Windows\System32\WindowsPowerShell\v1.0\powershell.exe

In the Add arguments (optional):
-noninteractive -nologo c:\pathtofile\powershellscript.ps1

From TechNet

I’m somebody!

Much like Navin R. Johnson, when I saw this in my notifications today I felt all giddy:

scottha-plus-one

The original post on Google+ was to announce the new Tekpub video Scott and Rob completed. It is called “Get Involved” and it covers various topics about getting involved in the social space as a developer. I highly recommend it.

The funny thing is that part of the video touches on getting people to respond to you via Twitter or having someone that you look up to or is famous retweet you, and this sorta felt the same to me. It isn’t the same, since it was easier for Scott to see my reply than it would be in a stream of tweets, but just having him +1 my comment made me feel good today.

TortoiseSVN global ignores

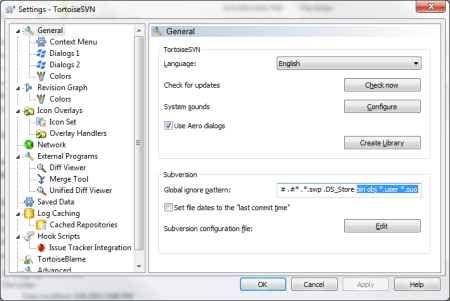
I know all the cool kids are using git and their .gitignore files, but in crufty enterprisey-land we still use SVN. I hated always having to ignore bin/obj, etc. for new projects, so a while back I found out how to set global ignores. I wanted to share this info with some co-workers, so I thought it would make a good blog post. That way I’ll be able to refer back to it when I format my HD and forget how exactly I set the global ignores “last time”.

It is really quite simple:

  1. Open TortoiseSVN settings by right-clicking > TortoiseSVN > Settings
  2. In the initial General dialog, in the lower Subversion section is a textbox labelled Global ignore pattern. Add your values here

tsvn-general

I use VS/C#, so I added bin obj *.user *.suo, YMMV.

CSS3 animation for Bootstrap icons

I found this great post on Elijah Manor’s blog where he animated the refresh icon. I don’t use Bootstrap on my site, but I did have the need for a refresh icon for an older post, and this would have been pretty cool. If only I had been smart enough to think of it. DOH!

If you want to skip all the specifics and just get to the payoff, here is the jsfiddle with the working animation:

ConvertCsvToList

I create a gist for a helper funtion I used recently to convert a CSV file’s contents to a typed list:

private IList<T> ConvertCsvToList<T>(IList<string> csv, string[] header) {
    var list = new List<T>();
    foreach (var row in csv) {
        var columns = row.Split(',');
        T obj = (T)Activator.CreateInstance(typeof(T));
 
        for (int i = 0; i < columns.Length; i++) {
            var h = Regex.Match(header[i].Replace("@", "_"), 
                @"(?<="")(?:\\.|[^""\\])*(?="")").Value;
            var c = Regex.Match(columns[i], 
                @"(?<="")(?:\\.|[^""\\])*(?="")").Value;
            var prop = typeof(Em.Schools.Data.Domain.Match).GetProperty(h);
            if (prop.PropertyType == typeof(int)) {
                prop.SetValue(obj, Convert.ToInt32(c), null);
            } else {
                prop.SetValue(obj, c, null);
            }
        }
 
        list.Add(obj);
    }
 
    return list;
}

Massive and multiple arguments

I thought that Massive would simple let me do something like this:

table.Delete(where: "Pin_Added = @0 and Pin_Schools <> @1", 
             args: new { pinAdded, pinSelected });

That would be slick! But I get something more like this:

lettering-kaboom

It turns out that that fancy anonymous object doesn’t get parsed. I tried to grab some of the fancy tricks from the MVC source code, like this:

RouteValueDictionary result = new RouteValueDictionary();

if (htmlAttributes != null) {
    foreach (PropertyDescriptor property in 
    			TypeDescriptor.GetProperties(htmlAttributes)) {
        result.Add(property.Name.Replace('_', '-'), 
        		property.GetValue(htmlAttributes));
    }
}

return result;

But that did not work. I found this post on DataChomp that solved my woes:

object[] args = { pinAdded, pinSelected };
table.Delete(where: "Pin_Added = @0 and Pin_Schools <> @1", args: args);

Horizontal Rule using CSS3 Gradient

I love all the little tricks you can perform with CSS 3. I saw this nice horizontal rule on MLSsoccer.com:

mls

The CSS is pretty simple:

hr {
	background: #ababab;
	background: url(data:image/svg+xml;base64,PD94bWwgdmVyc2lvbj0iMS4wIiA/
		Pgo8c3ZnIHhtbG5zPSJodHRwOi8vd3d3LnczLm9yZy8yMDAwL3N2ZyIgd2lkdGg9Ij
		EwMCUiIGhlaWdodD0iMTAwJSIgdmlld0JveD0iMCAwIDEgMSIgcHJlc2VydmVBc3Bl
		Y3RSYXRpbz0ibm9uZSI+CiAgPGxpbmVhckdyYWRpZW50IGlkPSJncmFkLXVjZ2ctZ2
		VuZXJhdGVkIiBncmFkaWVudFVuaXRzPSJ1c2VyU3BhY2VPblVzZSIgeDE9IjAlIiB5
		MT0iMCUiIHgyPSIxMDAlIiB5Mj0iMCUiPgogICAgPHN0b3Agb2Zmc2V0PSIwJSIgc3
		RvcC1jb2xvcj0iI2ZmZmZmZiIgc3RvcC1vcGFjaXR5PSIxIi8+CiAgICA8c3RvcCBv
		ZmZzZXQ9IjUwJSIgc3RvcC1jb2xvcj0iI2FiYWJhYiIgc3RvcC1vcGFjaXR5PSIxIi
		8+CiAgICA8c3RvcCBvZmZzZXQ9IjEwMCUiIHN0b3AtY29sb3I9IiNmZmZmZmYiIHN0
		b3Atb3BhY2l0eT0iMSIvPgogIDwvbGluZWFyR3JhZGllbnQ+CiAgPHJlY3QgeD0iMC
		IgeT0iMCIgd2lkdGg9IjEiIGhlaWdodD0iMSIgZmlsbD0idXJsKCNncmFkLXVjZ2ct
		Z2VuZXJhdGVkKSIgLz4KPC9zdmc+);
	background: -moz-linear-gradient(left,#ffffff 0%,#ababab 50%,#ffffff 100%);
	background: -webkit-gradient(linear,left top,right top,
		color-stop(0%,#ffffff),color-stop(50%,#ababab),color-stop(100%,#ffffff));
	background: -webkit-linear-gradient(left,#ffffff 0%,#ababab 50%,#ffffff 100%);
	background: -o-linear-gradient(left,#ffffff 0%,#ababab 50%,#ffffff 100%);
	background: -ms-linear-gradient(left,#ffffff 0%,#ababab 50%,#ffffff 100%);
	background: linear-gradient(to right,#ffffff 0%,#ababab 50%,#ffffff 100%);
	filter: progid:DXImageTransform.Microsoft.gradient(
		startColorstr='#ffffff',endColorstr='#ffffff',GradientType=1);
	margin: 20px 0;
}

You can just swap the #ababab color for whatever color you’d like to change the gray, but of course that would not change out the encoded image. Personally, I would just get rid of the embedded image and let browsers that don’t support CSS gradients to use the fallback solid color.

LightSwitch

First of all, WOW!

I had heard about LightSwitch, but I always got that same vibe as I am sure everyone else did – that it was a bit of a “toy”. I never really got into the whole Silverlight LOB thing, so I did not really think tweice about LightSwitch. Plus the whole sepearate download thing…

As Michael Washington said in an interview when asked if LightSwitch was a bit too basic for the “hard core” developer:

It’s in Visual Studio, so if you aren’t already a person who would open up Visual Studio it is not the product for you.

That pretty much puts things into perspective.

I needed a reporting solution, and I wanted something fast and simple. I know I cannot give a report builder to a marketing person and say, “have at it!” They won’t understand the db schema, and I would just wind up building the report myself. I decided it was the right time to give LightSwitch a go, and man am I impressed!

With Visual Studio 2012 Update 2, LightSwitch 3 was released. Included in LightSwitch 3 is the ability to create HTML5 clients. It is pretty darned awesome! LightSwitch makes getting started simple, but if you want to dive-deep you can. I was able to take our db and throw together a couple of sample reports in minutes. I even made a couple more while demoing LightSwitch for my peers – it is just drop-dead simple. However, don’t let the simplicity fool you – there are plenty of hooks to get in deep.

LightSwitch uses jQuery mobile, so it can use all the cool jQuery stuff out there. Wijmo is building LightSwitch-specific implementations of their widgets that should be in beta soon, but you could just use the current Wijmo widgets with a little elbow grease.

I am so stoked to get to using LightSwitch. I was dreading making these reports, but now I am actually excited. It will be so easy to make them that it will actually be fun. Whodathunkit?

Resources